Wednesday, February 27, 2013

Metal Cabinet Revamp

My sister claims that Macklemore's song "Thrift Shop" is the soundtrack of my life, due to my propensity to take home things that other people might consider garbage. Because they put it out next to their trash cans. Whatever. I found this cabinet, *not* on the side of the road, but in my own attic when I purchased the house.  So ha! 

There was a little problem... It was disgusting. Really, really gross. Like squirrels all up in this bitch gross. So I left it in the attic and avoided it at all costs, hoping it would magically go away and take a shower on its own. Alas, the cabinet showed quite alot of chutzpah and just sat there. So it was up to me.  Sure it was covered in narst, but when have I ever backed down from a challenge? Also, it was free, which made up for many other defects. 

Musical Interlude: Thrift Shop Video


Before cleaning on the left, After cleaning on the right

Interior before cleaning and removing lovely contact paper.

I believe I used every cleaner I own, but mostly Bar Keeper's Friend. I even wore rubber gloves! It was at least 2 solid hours of crud murder. This is my idea of fun. I think. Anywho, after cleaning, the bottom edges were a little holey and rusty, but nothing that couldn't be covered up fixed with spray paint. Rustoleum to the rescue! The chrome after a scrub was perfect, so I removed the handles and taped the edging and sprayed away. In the stairway, in winter, with no ventilation. I would not recommend this at all, but sometimes things just have to get done. Right. Now.


Yey! No more squirrel pee!

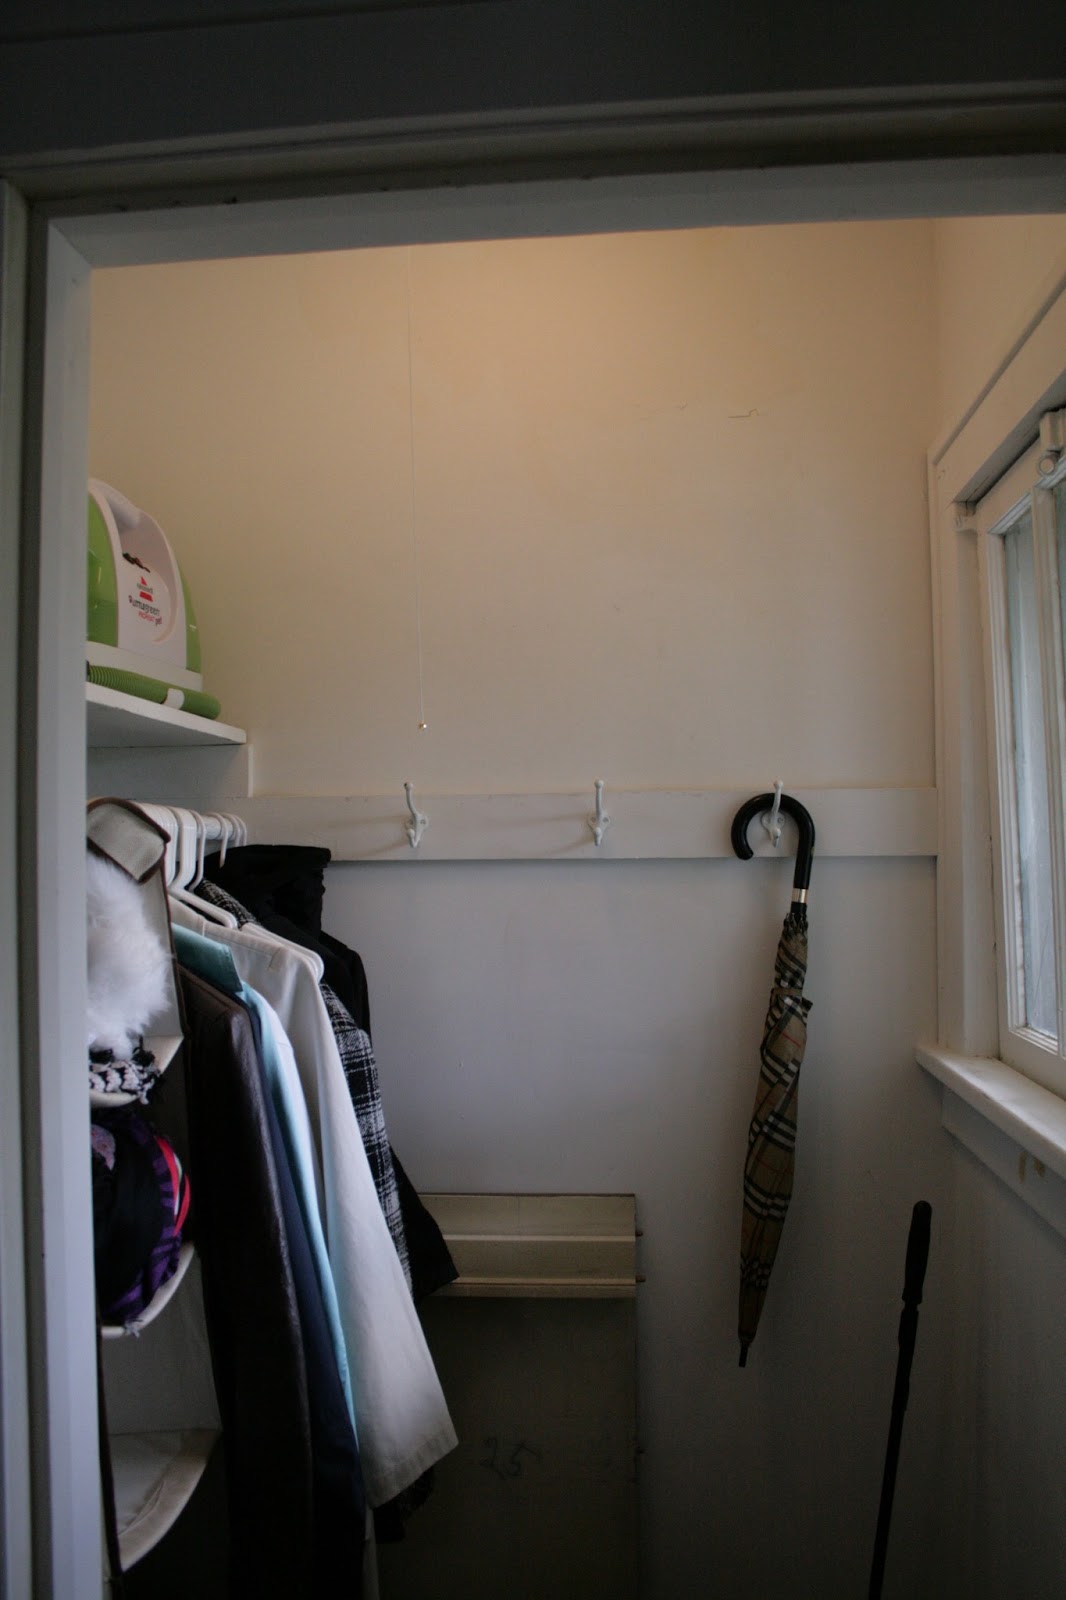
So this was supposed to be a project for the kitchen. But then it didn't work at allllll in the space I was going to put it in it. So much for planning! Its new home is now is the side staircase. It holds cleaning supplies, which were forever falling off the wire shelves I have out there, as well as leftover beverages from parties that I host pretty regularly.  It's also a handy spot to throw tools and project bits with which I'm not quite done.  

The Big Ta-Da

Wednesday, February 20, 2013

Coat Closet Upgrade


I am lucky enough to have a large coat closet in my house.  Until recently, it was the only room in the house I had not tackled (ignoring the whole first floor, natch). Trim and walls still covered in the world's cheapest paint, coat hooks everywhere, primer only on the ceiling, which I had partially scraped. A depressing little space, saved only by the fact that it had a lovely window in it.


*Before*

In September when my sister told me she'd be moving in, I realized that everything that I had been storing in the guest room needed to go somewhere else. Ack! There was only one shelf in the coat closet, with plenty of room for another above. I could have just thrown up another shelf and gotten on with my life, but it seemed this was the time to tackle the closet for real.

So with a budget of exactly zero dollars, I went about fixing it up.  Out came everything. I scrubbed and scraped and primed and took down the coat hooks. I measured and cut a new shelf from wood left over from the old pantry shelving.  To hold up the shelf, cleats taken down from the bedroom closets were a perfect fit and just needed a coat of new paint. 
*During*
new shelves and more storage space!

All the trim was painted to match the rest of the house using leftover paint.  Then the walls were painted with the color from the hallway, as I had  a lot of that left over and I love a darker color in small spaces.  It also went well with a blue painted wood cart that I planned to use in the closet.  The shelves were painted to match the cart as a fun accent.  I spray painted 3 of the hooks black and re-installed them on the back wall.  The final piece was hanging up the Ansel Adams print - an old calendar page - in a frame I had in the attic. I no longer cringe when getting my coat in the morning and now the closet finally looks like it belongs in my house!


*After*


So glad to say goodbye to this!


Friday, November 16, 2012

Changing Table/Dresser for Baby Jane!


A furniture project!

So I promised Krista a changing table/dresser for Baby Jane. After several false starts, one ill advised purchase still sitting in my basement, and countless hours frittered away on Craigslist, I ended finding this beauty at the flea market where half the furniture in my house is from. I should have known not to look anywhere else!  It was the right length, depth, and height. It was just badly dinged and scratched up, with missing hardware, and peeling veneer. Oh, and the drawers didn't really slide either. Like I said, perfect!

So mom and I threw it in the SUV and got it home. Scrubbing ensued. Then Citra-Strip on the top to get off bubbled and gooey varnish. And then sanding the top to try and remove the scratches and dents.

The drawers needed major help in order to function again.  I removed the guides on the bottom, sanded them down and glued/nailed them back into place. All the edges of the drawers were planed and sanded down so they would fit again. Then I glued and clamped all the corners and edges where the veneer was pulling away.  Next I removed the old hardware - clanky, noisy drop pulls are no good for a baby's room!  After filling in the old holes, I installed the gold knobs that I found at Home Depot that very closely matched the original ones on the top two drawers.  

The drawer fronts and dresser top and side inset panels got a coat of Rustoleum gray universal primer and 4 coats of semi gloss paint in Behr's Cozumel (an awesome blue that matched the crib set).

The parts that stayed wood I carefully scrubbed/polished with super fine steel wool and Dr. Bronner's Castile soap in Almond. It smells totally delish and is all natural. After I was done, it shone like new!

For some reason, the stain still bled through somewhat on the top, but after a ton more paint didn't help, I gave up and called it "antiqued".

- Before -


- After -


Thursday, December 1, 2011

Gratuitous Glamour Shots of Christmas Decorations

I'm feeling lazy, so this is all just pictures. 
Everyone likes pictures better than my blathering anyway.

Our Tree! The End.
(I kid) 


The Office, sporting a new light fixture, and handmade wreath

More wreath

EVEN MORE wreath.  
What's that white thing you ask? Oh just a flower made of cupcake liners, no biggie

Lights around the door to the office from the dining room 


  Mantel from the right!

Mantel from the left!

FYI. I like sparkly things. In case you couldn't tell.

Sexy Close Ups:

Yes, that's Kostof making a cameo. That's for you, fellow architects. 

   
Bark and pine cones collected from the backyard. 
And then I painted the pine cones with leftover house paint. 
Behr Swiss Coffee to be exact.
 Because I know you all want to spend hours painting pine cones as well...


 Dining room center piece. 
Pine scented candle to make up for the fact I have a fake tree.
I'll get a real one next year, I promise.
 

  Yey china cabinet! Yey excessive amount of goblets!

Tree! In the dining room.

Fancied up mirror in the living room on the buffet. 
Mirror was found in the attic, window sash is from the Albany Historic Parts Warehouse.

More painted pine cones; 80s brass sconce I still haven't replaced.

 Living room windows. Still living with the sweeeet mini blinds. Gack.
Santa, if you're reading this, please leave 16 roman shades, of eco-friendly, 100% wool felt under the tree. That'd be super.

 Kitchen, with sparkly green ribbon.


And Frosty, of course. Made by my ever talented mother.

I have cute white lights outside, but's finally gotten cold here, so I refuse to go outside to take a picture of them right now. Or maybe ever?

Happy Holiday Season!


Friday, October 21, 2011

Some Furniture Projects

Because I don't have a TV, I have alot of free time. So I do things like this.

First up, a heat lamp (?) thing that I found in my basement after the Great Flood of the Spring. Hence the crud.

Pow! Cleaning ninja strikes again. Scrubby + plenty of hose action and a dash of Brasso and it's super shiny and lovely.

Detail shot of rusty crud

Now it just has "patina"

Second project, a craigslist dresser scored for 30 bucks. I didn't really need a dresser. At all. But I could not pass it up. So I remembered a dresser from Chelsea Textiles Ltd. that I really liked and decided to actually paint a piece of furniture. 


Inspiration


It took alot. But, the drawer faces were laminate and the top/sides were covered in poly, so no "original finish" was harmed during the production of this project.


Start: Wash it down and lightly sand the surfaces. Go to Home Depot and get a sample of  Behr Premium Ultra interior flat in "Manuscript".
 
Chicken out and just paint the drawer fronts. Contemplate just the gray for a while. Wonder how hard it would be to remove the integral handles. Look for long drawer pulls on the interwebs. Gasp at the prices.

Proceed to buy some of that new Martha Stewart paint in "Antique Gold". Paint integral wood handles. (I'm still on the fence as to painting the rest of the dresser. I am leaning towards just going for it. I can always un-paint it. I'm really good at that by now.)

Hunt around for more things to paint "Antique Gold". Bingo! Antique plant stand that's been in my family forever. It's inlaid wood veneer top was ruined years ago by water, and the top has been ugly ever since. Martha to the rescue! 
So I don't have a better picture than this, but the whole top and cross braces and interior face of the legs were painted, and now it's gorgeous again. Win.

I've been a terrible blogger, part 2 of 1027764959

Hurricane Irene!


Disclaimer:
Let me just say that I know that this is barely a pinprick, considering 20 miles away from me, whole towns were washed away, and I count my lucky stars to come out so unscathed.


Project 2: The front door  to the vestibule finally got so water logged that it started to come apart. So off it came!


Psssshhh. Who needs a door with pieces that align?
80 years of paint had to come off the front. Peel Away 7, the environmentally friendly kind, got the paint off where the wood was really soft. Then I just heat gunned (at low temp) the rest of it. So a week full of nights was spent in my basement just removing paint.
It got to this stage and then we had another hurricane dump a bunch more water on us. So, of course, the basement flooded. Just a baby flood though. Still enough to deter me for a while. And then I needed to use epoxy and wood hardener. I couldn't find the good stuff (Liquidwood) so I picked up some nonsense from Minwax. It's so flammable I couldn't use it near any pilots lights, aka the water heaters I was 5ft away from. So I had to wait for a dry sunny weekend in September... Which never came. So we finally got nice weather the first weekend in October. I hauled the door outside. I promptly found a place to purchase the Liquidwood in Saratoga. Fabulous. Happy that I found the good stuff, not so happy that I wasted three weeks waiting to use the crap that would blow me up.

Braces on the bottom corner. Not pretty, but there were already two bolts attempting to hold the piece in place. Obviously that was not working anymore. These are on the inside and will be painted over so hopefully no one will really notice them. Unless you read this blog (ha!).  I straightened it all out the best it was going to be and then leveled off the bottom 1/8th inch with the jigsaw. It's currently primed and waiting in the basement for me to paint it this evening. What a way to spend Friday night!


Project 3: Ceiling in Vestibule caves in due to water from hurricane. 

At this point I'm pretty sure I'll never name one of my future children Irene. Note the menacing cracks. These correspond nicely to the panel of the porch floor that was cut out and put back in without any sealant around it. Workmanship abounds in this place... 


Fast forward two days. A chunk falls out.  So then I spend an evening ripping out the rest of the left side of the ceiling, which was also about to drop. Good thing that pesky front door already had to be removed so it wouldn't get in my way. Gaaaaa. It's still all tore up. Hopefully I'll get to that this weekend.

Project 4: Roof at chimneys starts leaking during hurricanes. Starts to ruin plaster in dining room.  Surprise! Both chimneys need new counter flashing! No pics, mainly because no way am I going on my roof. Hello vertigo. Still trying to get this done before we are dealing with snow.  They were quickly repaired with silicone caulking, but that's far from a permanent solution. It's holding for now at least...